Everything you need to
get up and running
This guide walks you through every feature of HireCheck — from adding your first piece of equipment to sending condition report links to customers through Booqable or your chosen hire software.
What is HireCheck?
HireCheck is a cloud-based equipment condition recording platform designed specifically for plant and equipment hire businesses.
Every time a piece of equipment leaves your yard, there's a risk of a dispute over pre-existing damage. HireCheck solves this by giving you a permanent, timestamped record of every inspection — complete with photos, condition ratings, staff notes, and customer signatures.
Each piece of equipment gets its own public condition report link that you can embed directly into your hire contracts — whether you use Booqable or any other hire management software. Your customers can see exactly what condition the equipment was in before they took it — which protects both of you.
Key features at a glance
| Feature | What it does |
|---|---|
| Equipment register | A central record of all your plant and equipment |
| Photo inspections | Record condition with photos, notes, and condition rating |
| Customer signatures | Get the hirer to sign off on condition before they take the equipment |
| Public condition reports | A shareable link showing the full inspection history for each item |
| Hire software integration | Embed condition report links directly into your hire contracts — works with Booqable and most other platforms |
| Document attachments | Attach risk assessments, licences, and service records to equipment or inspections |
| QR code stickers | Download a printable QR for every piece of equipment — scan on-site to open the inspection form instantly |
| Custom branding | Add your own logo and colours (Business plan) |
Accessing the app
HireCheck works in any web browser — no installation needed. For the best experience, add it to your home screen so it opens like a native app on your phone.
Desktop (computer)
Open any web browser (Chrome, Edge, Safari, or Firefox) and go to your HireCheck URL. Log in with your email and password. That's it — no software to install.
iPhone — add to home screen
Adding HireCheck to your iPhone home screen makes it open in full screen, just like a downloaded app.
The HireCheck icon will appear on your home screen. Tap it to open the app in full screen with no browser address bar.
Android — add to home screen
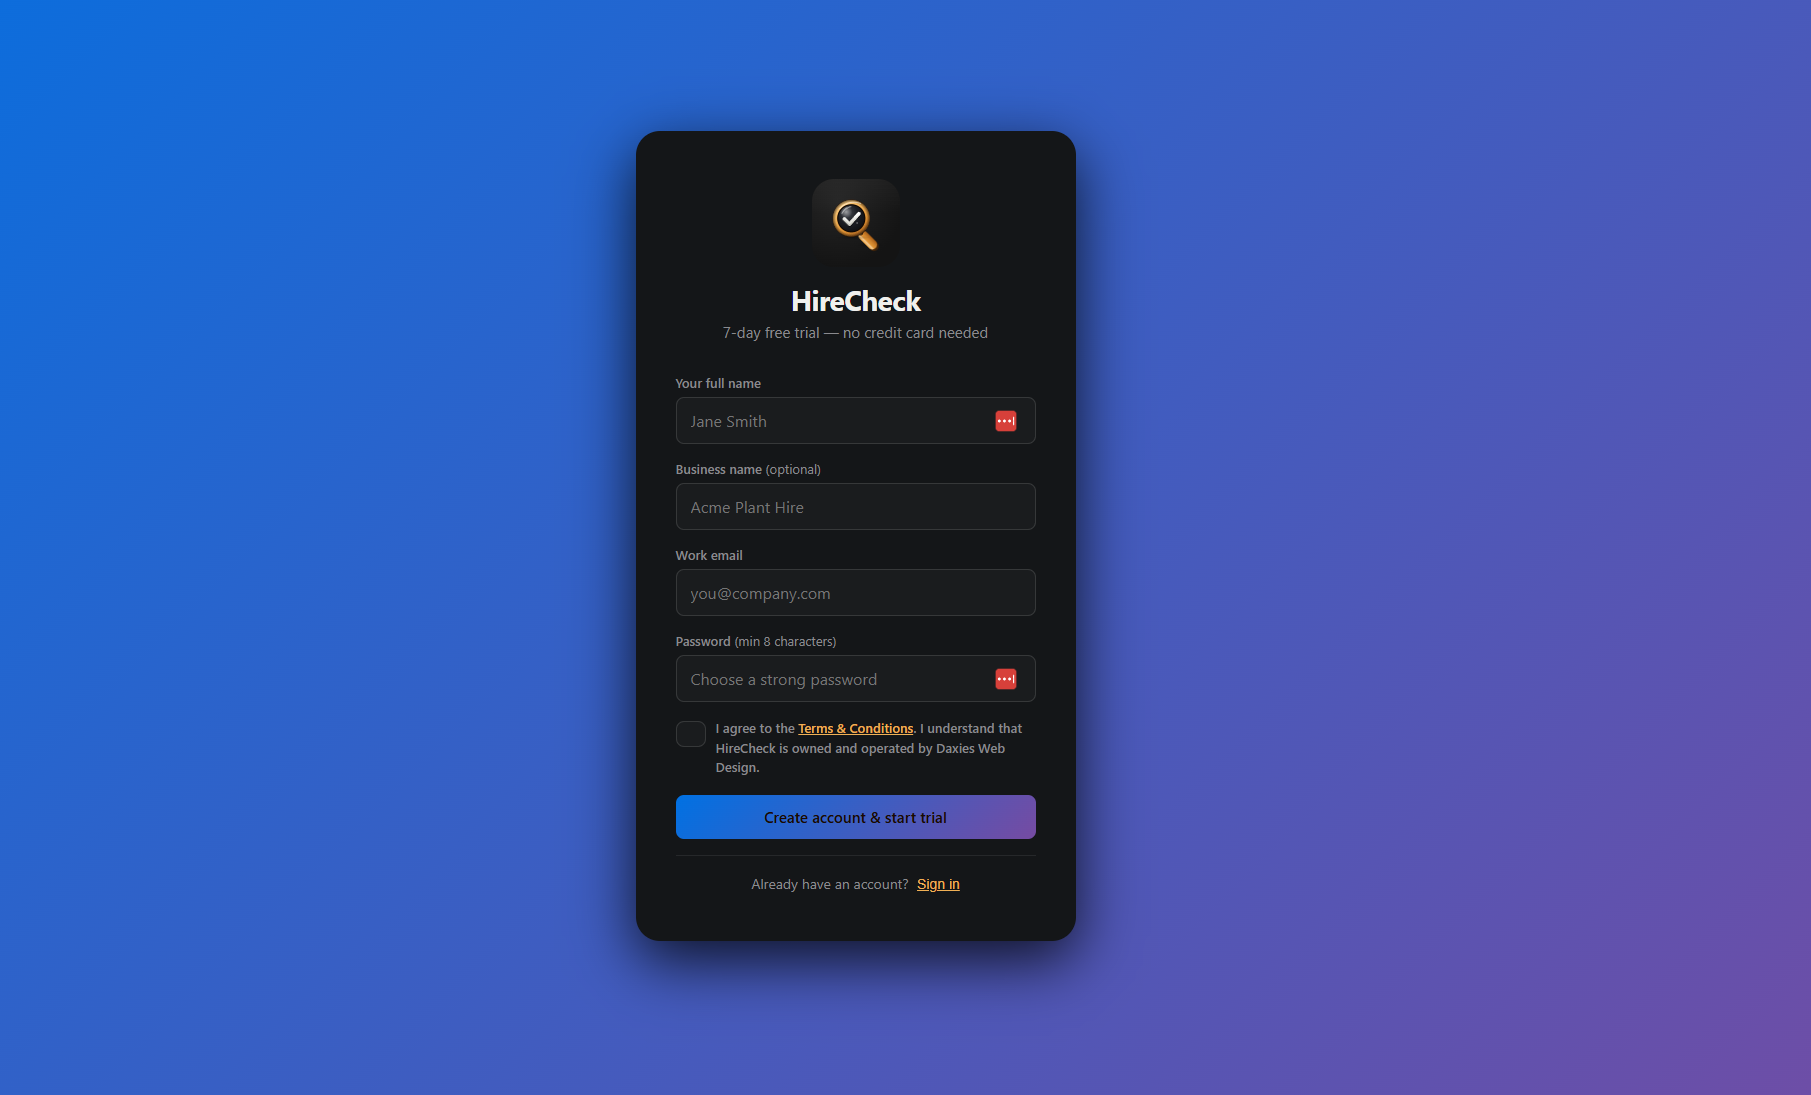
Creating your account
Getting started with HireCheck takes less than two minutes. You get a full 7-day Business plan trial — no credit card required.
Your first login
After signing up you'll land on the Dashboard. Here's what you're looking at.
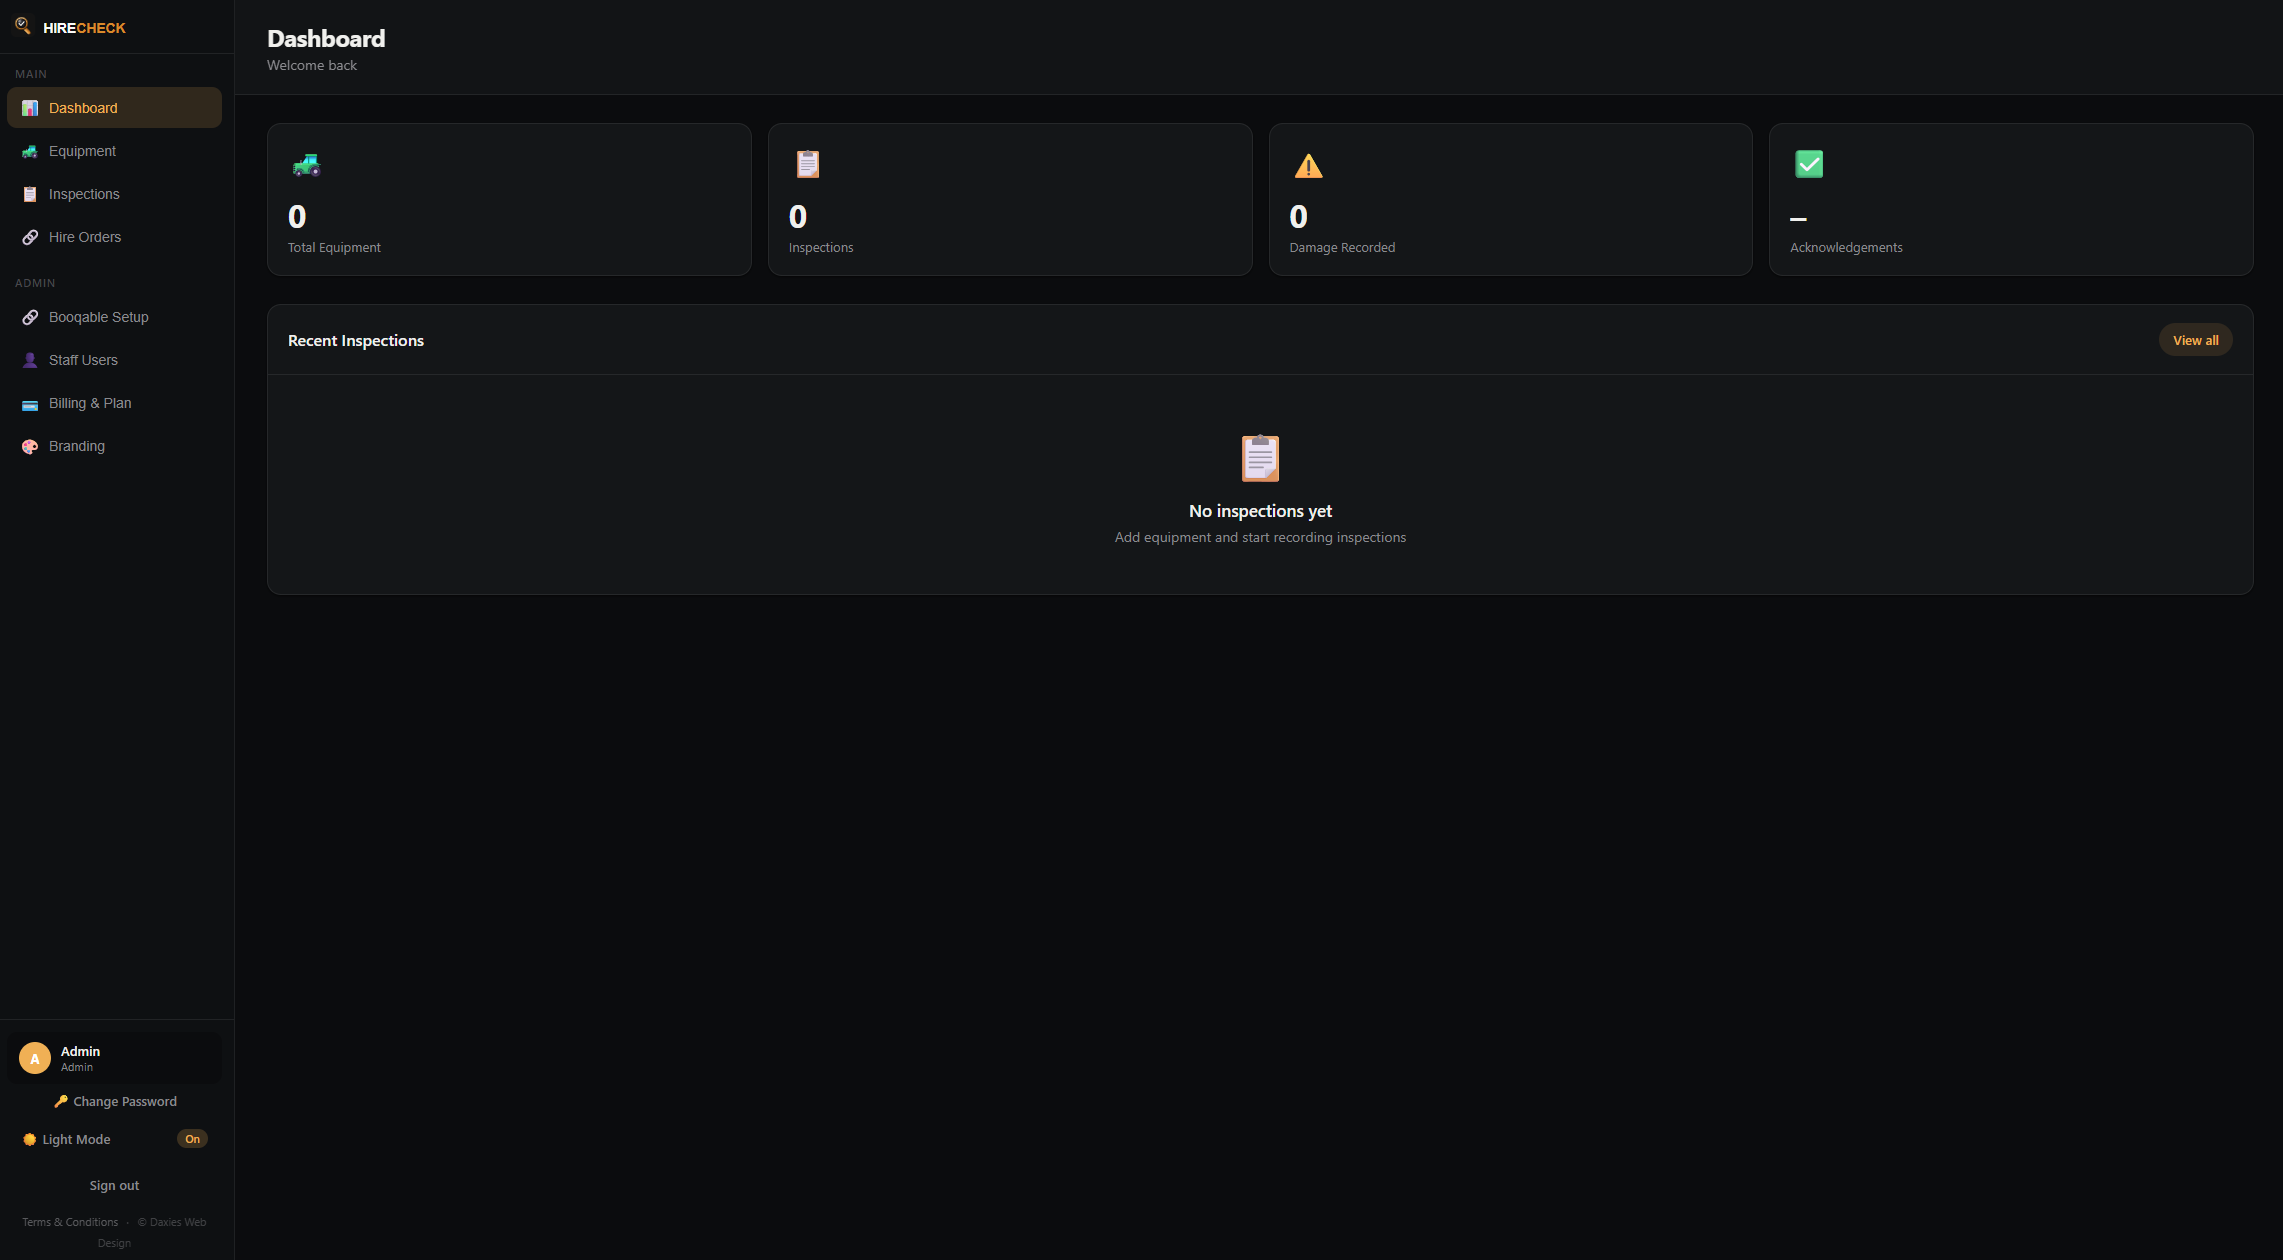
The sidebar
The left sidebar is your main navigation. It contains:
- Dashboard — a summary of recent activity, inspection counts, and equipment stats
- Equipment — your full equipment register
- Inspections — a log of all inspections across all equipment
- Hire Orders — orders synced from Booqable or your hire software (if integrated)
- Branding — customise your logo and colours (Business plan)
- Billing & Plan — manage your subscription
Adding equipment
Every piece of plant or equipment you hire out should have its own record in HireCheck. This is the foundation everything else is built on.
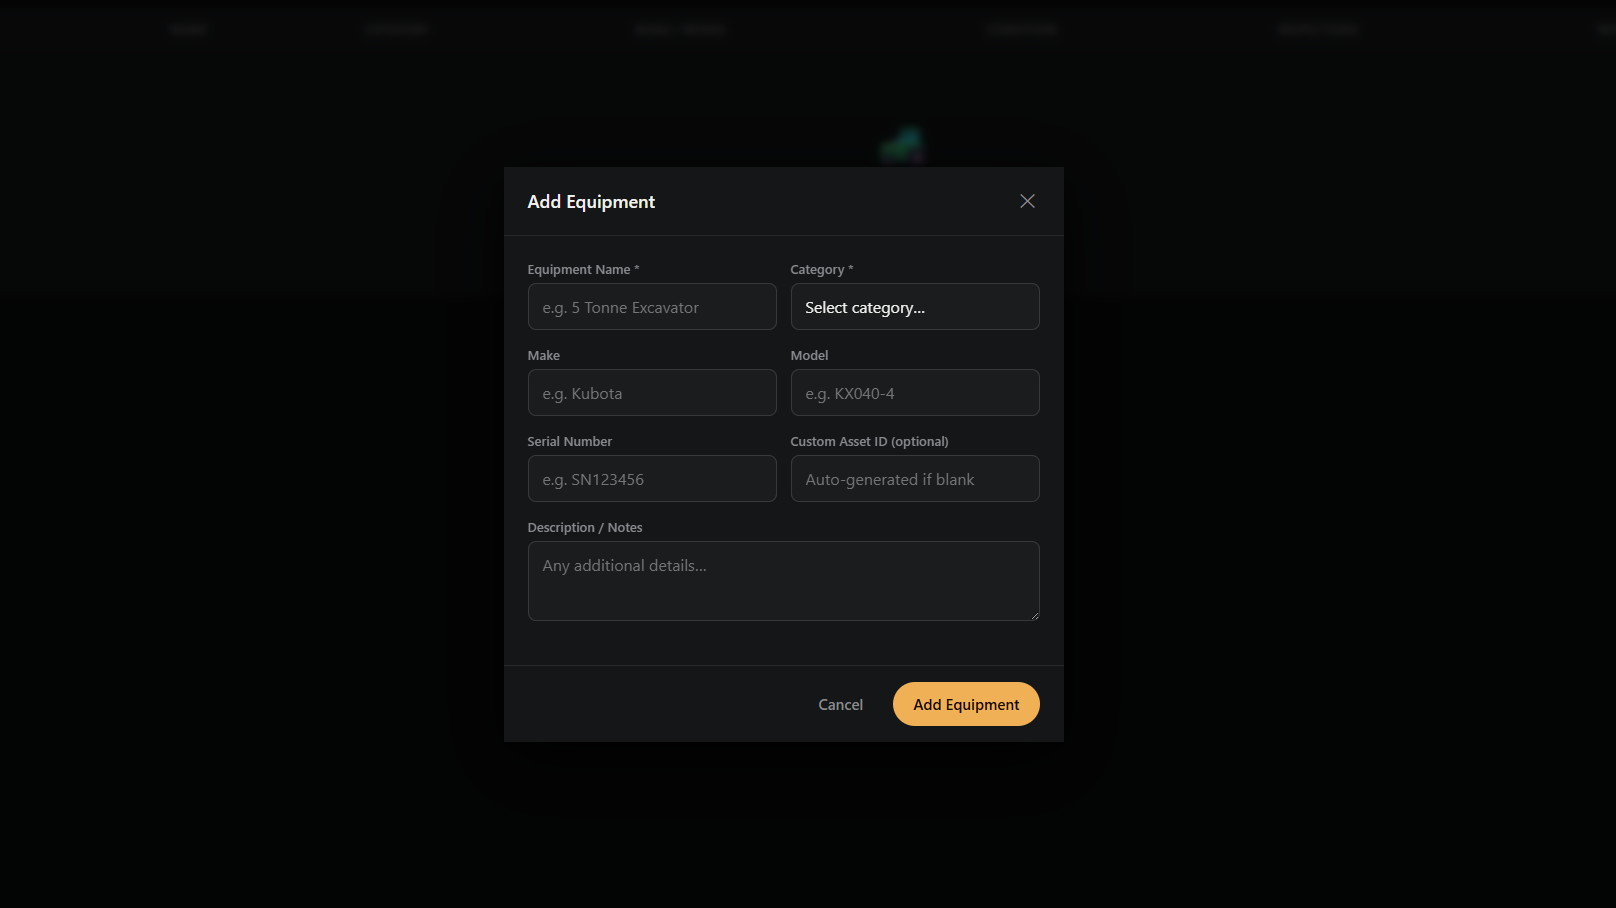
Bulk import & export equipment (CSV)
If you have a large fleet, you can add all your equipment at once by importing a CSV file. You can also export your current equipment list at any time. This feature is available to admins only.
Exporting your equipment list
Click Export CSV on the Equipment page to download your full equipment list as a spreadsheet. This is useful for keeping a backup, or as a starting point for bulk additions.
Importing equipment in bulk
The equipment detail page
Click any piece of equipment to open its detail page. This is the hub for everything related to that item.
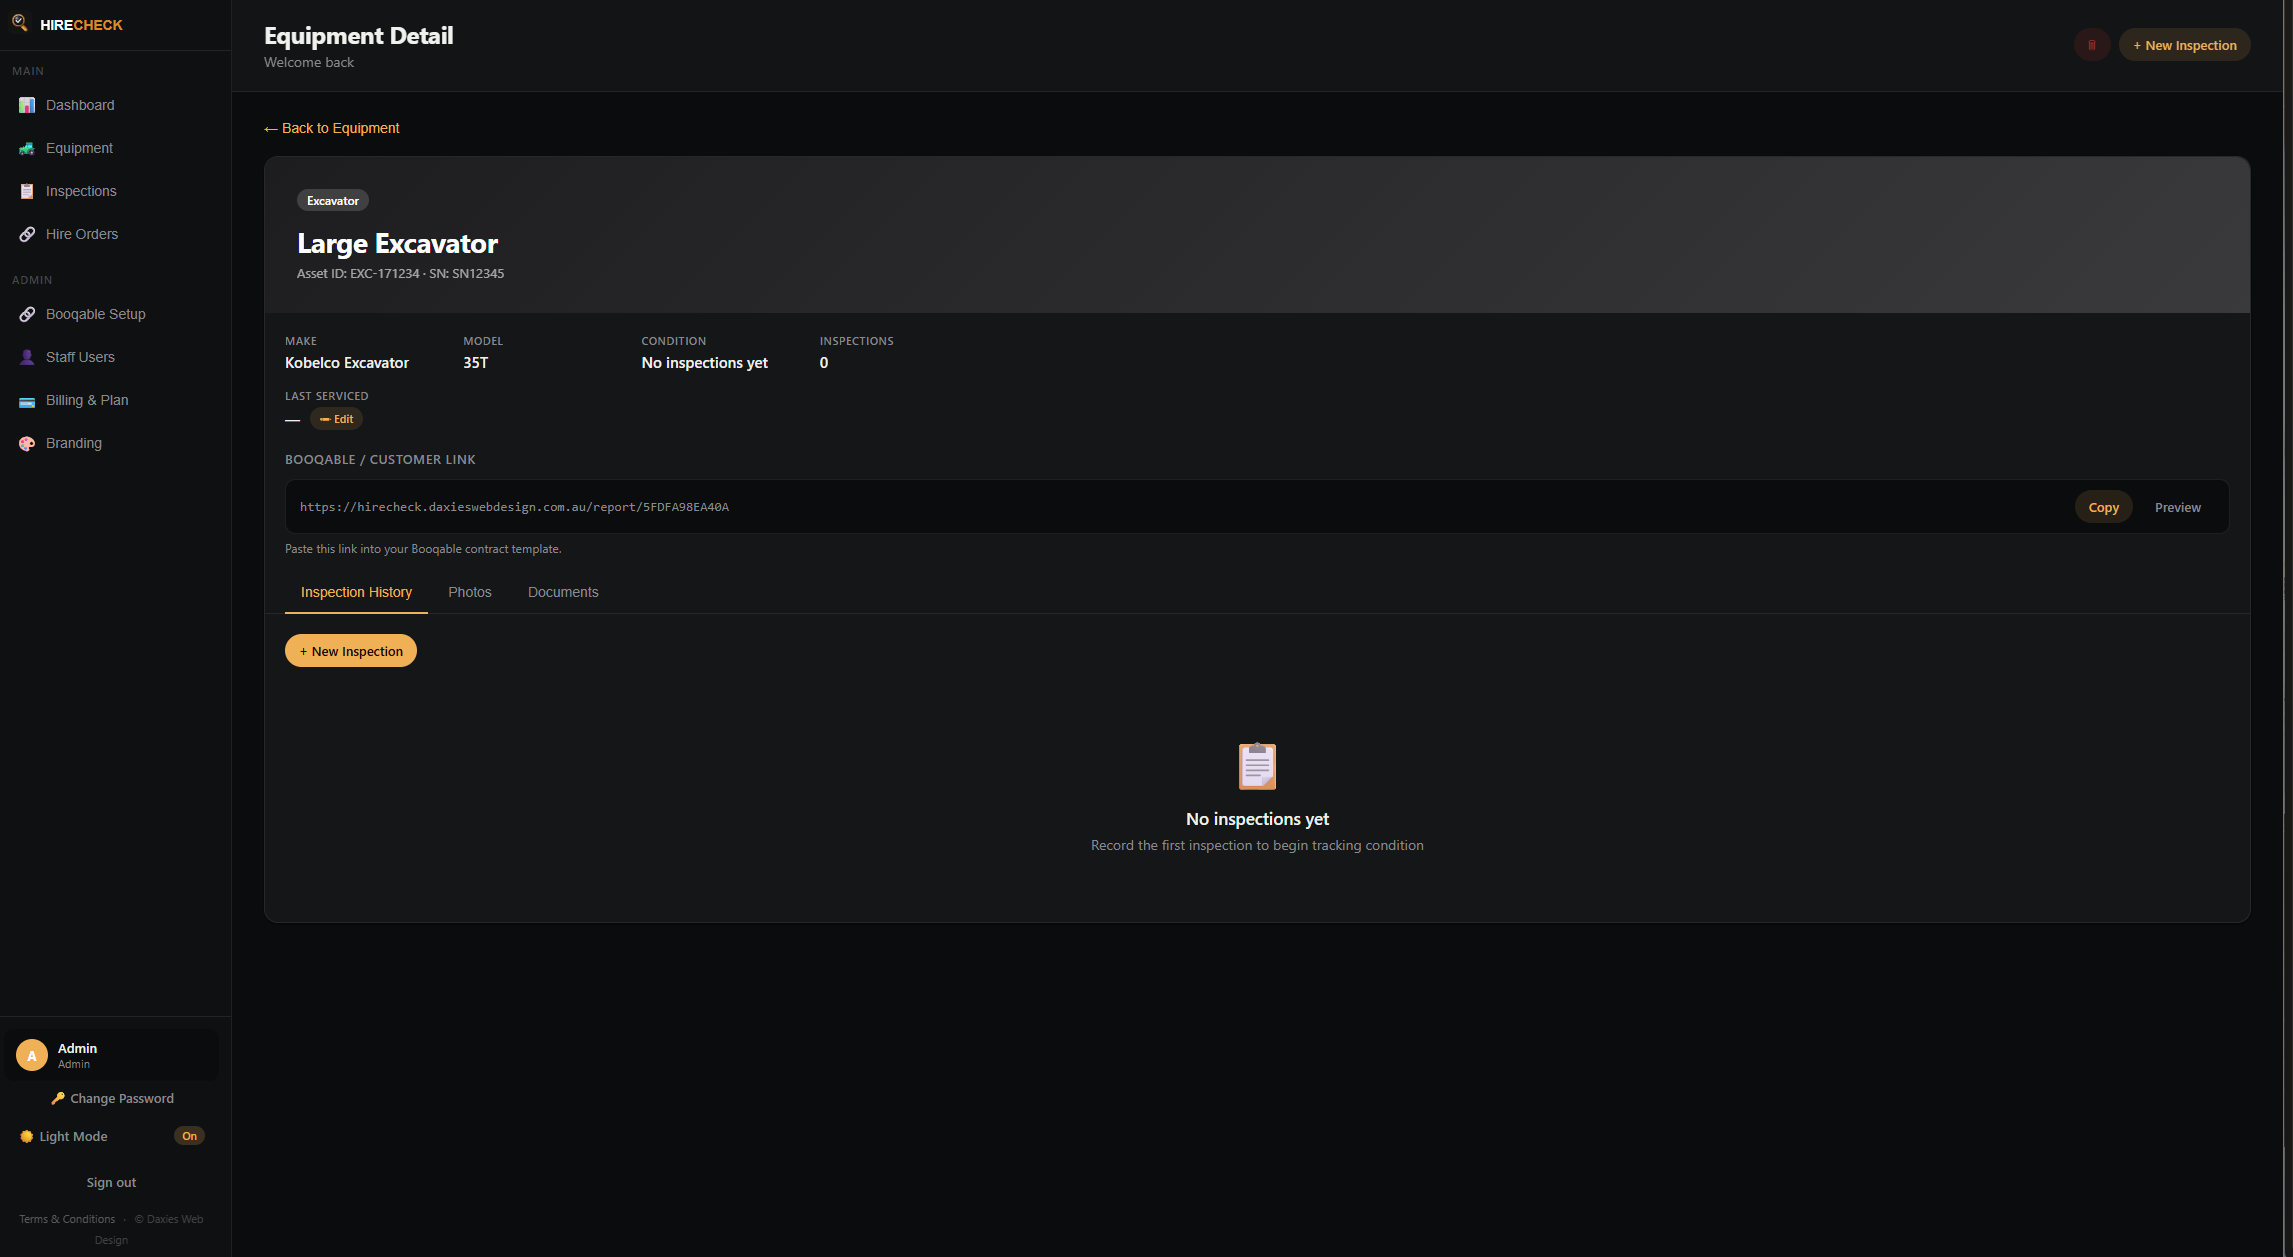
What's on this page
- Info panel — make, model, condition summary, inspection count, and last serviced date
- Customer link — the public URL to embed in your hire contracts. Copy it with one click
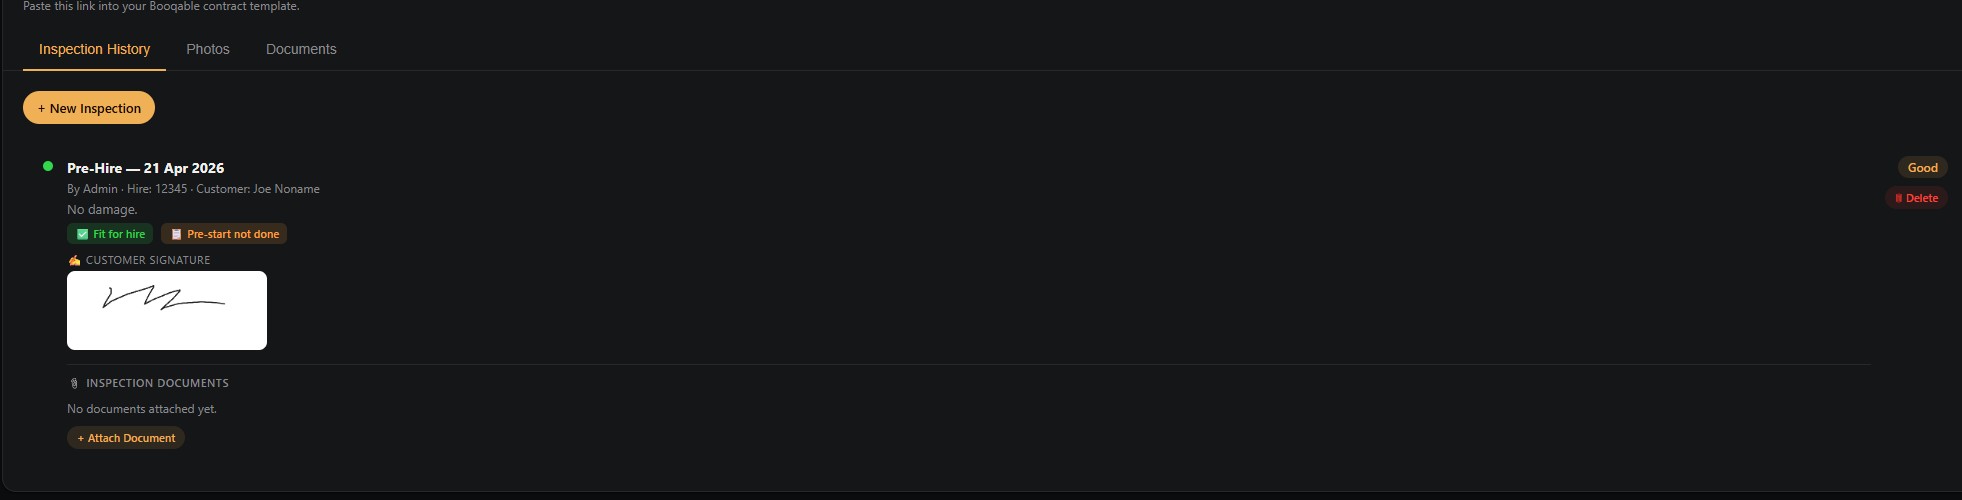
- Inspection History tab — every inspection recorded for this item, newest first
- Photos tab — all photos from all inspections in one gallery view, with download option
- Documents tab — files attached at the equipment level (manuals, certificates, service records)
Last serviced date
Keep track of when each piece of equipment was last serviced so you know what's due.
Attaching documents to equipment
Attach files like compliance certificates, manuals, or service records directly to a piece of equipment so they're always easy to find.
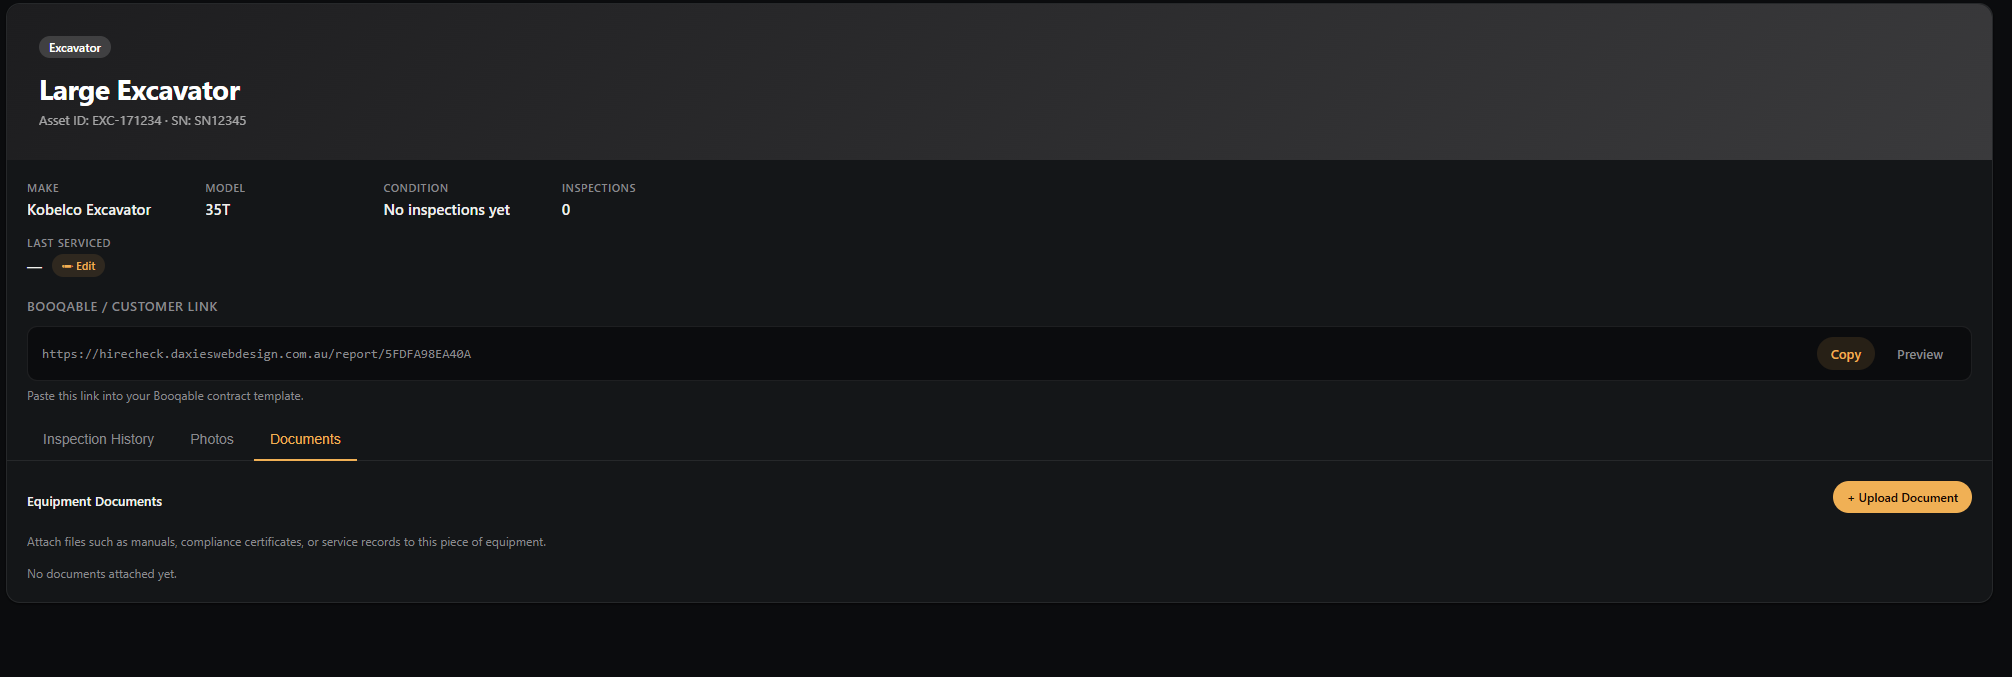
The customer link
Each piece of equipment has its own permanent public URL — the condition report link. This is what you embed in your hire contracts, whether you use Booqable or any other platform.

The link shows your customer a read-only condition report page with the full inspection history, all photos, condition ratings, and any notes. It updates automatically every time a new inspection is recorded — there's nothing to resend.
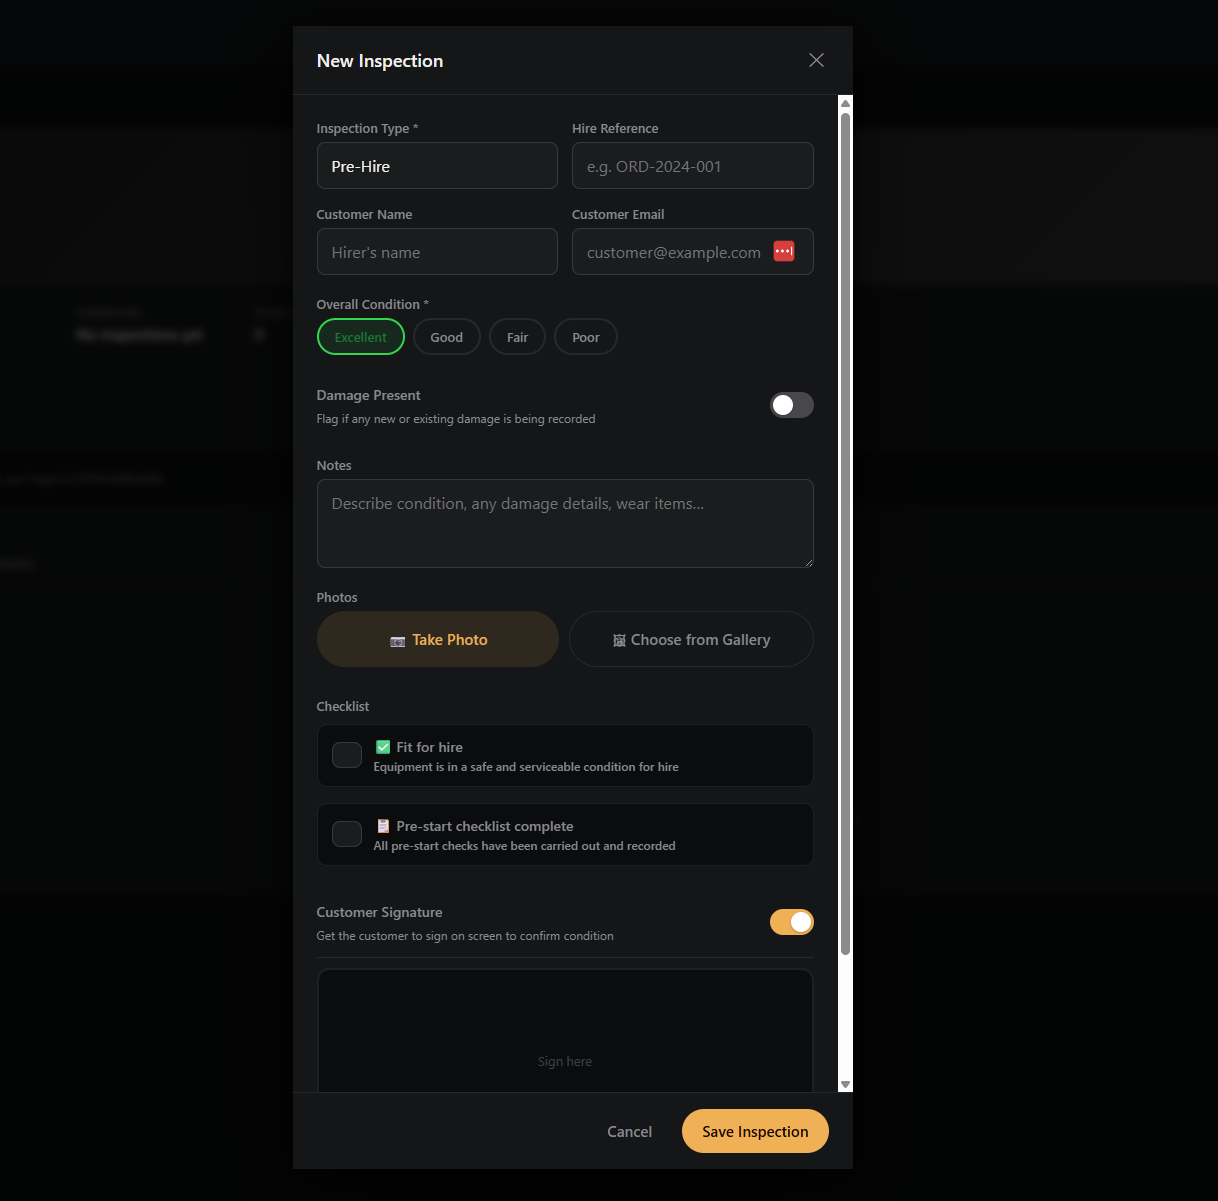
Recording an inspection
Inspections are the heart of HireCheck. Record one before every hire and every return to build a complete, timestamped condition history.
QR code stickers
Every piece of equipment gets its own unique QR code. Print it out, stick it on the machine, and your staff can start an inspection in seconds — just point their phone camera at it.
Downloading a QR code
Scanning a QR code to start an inspection
There are two ways to use a QR sticker once it's on the equipment:
Option 1 — Any phone camera (recommended). Open your phone's camera app and point it at the QR sticker. A link will appear at the top of the screen — tap it. The inspection form opens in your browser, already loaded with that piece of equipment. Log in if prompted, then fill in the form as normal.
Option 2 — From the HireCheck dashboard. Tap the amber 📷 Quick Inspection banner on the dashboard. This opens a dedicated inspection page with a Scan QR Code button at the top. Tap it, point your camera at the sticker, and you'll land straight on the correct equipment's form. You can also scroll down to select equipment manually if you don't have a QR sticker handy.
What happens when the QR is scanned?
The QR code encodes a unique web address for that piece of equipment. When someone scans it:
- If they're already logged in, they go straight to the inspection form for that item
- If they're not logged in, they'll see a quick login screen — once they log in, the form loads automatically
- The equipment name, category, and details are pre-loaded — no typing required
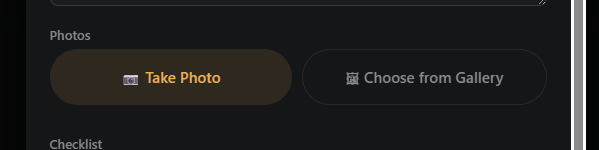
Adding photos to an inspection
Photos are your strongest evidence. Add as many as you need — there's no limit.
In the inspection form, tap Take Photo to use your device's camera directly, or Choose from Gallery to upload existing images. Each photo can have a caption and you can flag individual photos as showing damage.
Fit for hire checklist
The checklist lets you formally confirm that the equipment is safe and ready before it leaves your yard.
At the bottom of the inspection form you'll find two checklist items:
- Fit for hire — tick this to confirm the equipment is in a safe and serviceable condition for hire
- Pre-start checklist complete — tick this to confirm all pre-start checks have been carried out and recorded
These flags are displayed on both the inspection history and the customer condition report page so there's no ambiguity.
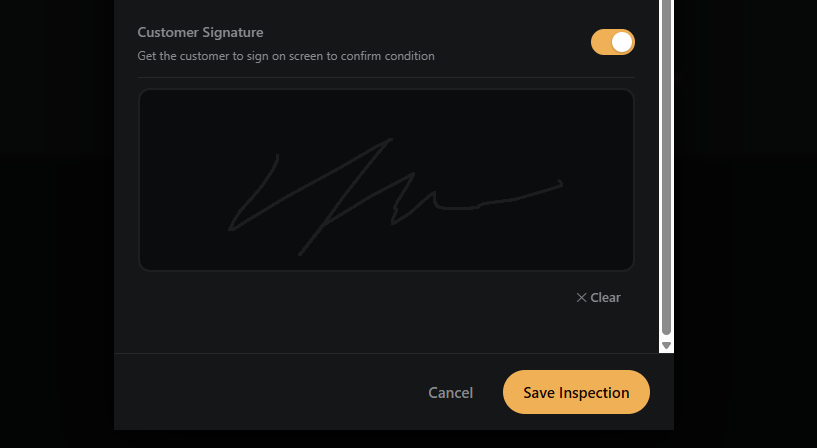
Customer signature
Get your customer to sign directly on screen to acknowledge the condition of the equipment before they take it. The signature pad appears at the bottom of every inspection form — it's optional, but we strongly recommend using it for pre-hire inspections.
Attaching documents to an inspection
Some hires require specific paperwork — risk assessments, operator licences, or permit documents. Attach them directly to the relevant inspection.
In the Inspection History tab, each inspection record has an 📎 Inspection Documents section at the bottom. Click Attach Document to upload a file. Supported types: PDF, Word, Excel, and images up to 20MB.
Booqable integration — how it works
HireCheck works with Booqable and most hire management platforms — your customers can view the condition report for each piece of equipment directly from their hire contract.
Here's the flow:
- Each piece of equipment in HireCheck has a unique condition report link
- You add this link as a custom field in Booqable against the matching product
- You add a placeholder to your Booqable contract template that pulls in this link
- When a customer receives their contract, they see a clickable link to the condition report
- Every time you record a new inspection, the report updates automatically — the link never changes
Setting up the Booqable integration
This is a one-time setup. Once done, adding links for new equipment takes about 30 seconds per item.
Step 1 — Add a custom field in Booqable
Step 2 — Add the link to each product in Booqable
Step 3 — Add the placeholder to your contract template
{{product.condition_report}}
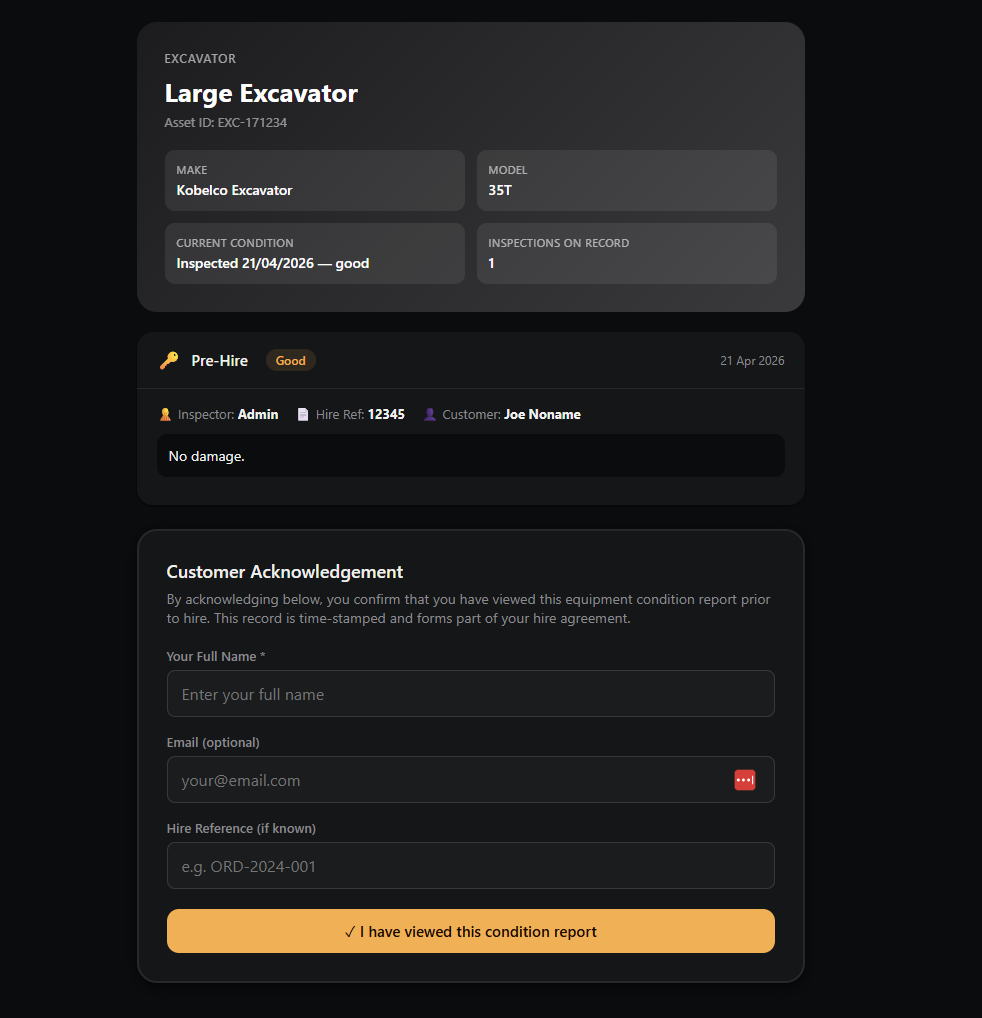
The public condition report page
This is what your customer sees when they click the link in their hire contract.
The public report page shows:
- Equipment name and category
- Overall condition summary
- Full inspection history — dates, types, condition ratings, and notes
- All inspection photos, in chronological order
- Damage flags where applicable
- Customer signatures where recorded
- Fit for hire and pre-start checklist status
The customer can view this page on any device — phone, tablet, or desktop — without needing to log in or create an account.
Custom branding
Business plan subscribers can replace the HireCheck branding with their own logo and colours throughout the app and on the public condition report pages.
Managing staff users
Add your team so they can record inspections from their own devices without sharing your admin login.
User roles
| Role | What they can do |
|---|---|
| Admin | Full access — add/edit/delete equipment, manage users, access billing and branding |
| Staff | Record inspections, add photos, view equipment — cannot delete records or access billing |
Staff users are managed from the Settings section. The number of staff accounts you can add depends on your plan (2 on Starter, 10 on Pro, unlimited on Business).
Billing & plans
Manage your subscription from the Billing & Plan page in the app.
Available plans
| Plan | Monthly | Yearly | Equipment | Staff |
|---|---|---|---|---|
| Starter | A$39/mo | A$429/yr | 20 items | 2 users |
| Pro | A$79/mo | A$869/yr | 100 items | 10 users |
| Business | A$149/mo | A$1,639/yr | Unlimited | Unlimited |
Yearly plans save you the equivalent of one month's subscription. You can switch between monthly and yearly billing at any time from the Billing page inside the app.
Changing your password
You can change your password at any time from inside the app.
Click 🔑 Change Password at the bottom of the sidebar. Enter your current password and your new password, then confirm. If you've forgotten your password, use the Forgot password? link on the login page and a reset link will be sent to your email.
Frequently asked questions
Does the condition report link change when I add new inspections?
No. The link is permanent and always shows the latest inspection data. You only ever need to set it up in your hire software once per piece of equipment.
Can my customer sign on their own phone?
Yes. The inspection form works on any device with a web browser. For best results on mobile, open HireCheck in Chrome or Safari and hand the device to your customer to sign.
What happens to my data if I cancel?
Your data is retained for 30 days after cancellation. During this period you can reactivate your subscription and everything will be exactly as you left it. After 30 days, data is permanently deleted.
Can I use HireCheck without Booqable?
Yes. HireCheck works perfectly as a standalone condition recording tool, and the condition report link can be embedded into any hire software that supports custom fields or contract templates — not just Booqable. You can also share the links directly via email, SMS, or any other method.
Is my data secure?
Yes. HireCheck is hosted on Railway's cloud infrastructure with encrypted data at rest and in transit. We never share your data with third parties.
Can multiple staff record inspections at the same time?
Yes. Multiple staff users can be logged in and recording inspections simultaneously on different devices.
Does HireCheck work offline?
HireCheck requires an internet connection to save inspections and photos. We recommend recording inspections where you have mobile data coverage.
Contact support
Need help? We're here for you.
HireCheck is built and supported by Daxies Web Design (ABN 16 813 608 279).
- Email: admin@daxieswebdesign.com.au
- Website: daxieswebdesign.com.au
We aim to respond to all support requests within one business day.